Why make compost?

What is so wicked about making compost?
Its the fact that your actually making Soil!
Soil: The foundation of health for all the living things, a recourse that is a sign of real wealth.
Here are Nine reasons for making compost
1. Replenishes the Soil, which sustains all animals on the planet
2.Reduce Landfill Area
3.Reduce Toxicity, when organic matter is buried, with no exposure to air it decomposes into some of the most toxic substances on the planet.
4 Reduce energy consumption & pollution
5.Reduce your Rates and Taxes, less government spending on wast collection
6. Reduce water use, Compost used as a mulch reduces evaporation and increases the water-holding capacity of the soil.
7 Improve your garden and save money, buying fertilizers is expensive.
8 Reduce Agricultural soil erosion, acidity and salinity problems, Using synthetic chemical fertilizers degrads the quality of topsoil in every modern agriculture country in the world.
9 Reduce levels of Green house Gases, each hectare of replenished soil can absorb several tonnes of greenhouse gases back from the atmosphere.
How to compost
Composting for the Homeowner Composting is the biological decomposition of organic material into a humus-like substance called compost. The process occurs naturally, but can be accelerated and improved by controlling environmental factors. People may wonder, “Why bother with composting if everything organic decomposes eventually anyway?”
If raw wastes are put directly into the soil, the decomposition process will rob the soil of nitrogen, an important nutrient for plants. (Soil incorporation is one method of composting, but requires leaving the area fallow.) Finished compost from a pile is typically a more uniform product with a better balance of nutrients. It can be used throughout the growing season in many different types of applications.
With a pile, composers have more control over adding and mixing the amount of carbon and nitrogen rich materials used to make the end product. In addition, a properly controlled composting environment can ensure production of high temperatures needed for killing weed seeds, diseased plant tissue, and pathogenic organisms.
So how do you actually put all this together?
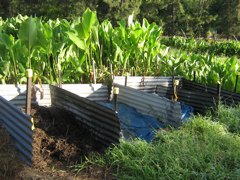
First consider the compost location (you will need two compost bins (spots) right beside each other) f Size for each bin of 3 feet by 3 feet, or a little bigger.
-If possible avoid direct sunlight and areas exposed to strong winds, which can dry and cool the pile. A half day sun situation is ideal.
-Place on a flat level surface one that drains well. Blanks of wood or gravel and create excellent drainage. You do want your compost to be moist, but if it sits in water, your neighbors will be telling you about it.
-Select a convenient location. One that is easy to get to and not where you will have to trudge a long distance just to add your carrot peelings.
-has water access
-and near to storage space for: carbon (leaves, shredded paper, saw dust, dry materials)
Compost layering!
Remember making compost is so incredible because you are making soil! ;) heee
Alright to make layers you will need:
Nitrogen - organic matter, greens, fresh grass clippings, think fresh green. Plus the smaller these materials are shredded the faster they will break down.
Carbon - leaves, shredded paper, saw dust, dry materials
Activators - old compost, manure (horse, cow, chicken, goat, pig poop)care full some poop is stronger then others (chicken poop has ten time the nitrogen content to cow poop) there for use allot less chicken poop to cow poop, organic fertilizer, old tea drags, alovara, inoculating herbs.
Garden soil - soil strait from your garden containing billions of microbe organisms!
Layer it!
Start with a thick (3/4 of a foot) layer of carbon
then 1/4 foot layer of Nitrogen
then 1/4 foot of activators
and a sprinkle of soil.
Be aware that the compost needs to be moist like a sponge, add water to every layer.
Continue this layering process, except use 1/2 foot of carbon for the rest of the layers.
NOTE: this layering method can be hard to gage, so test out different layer thickness if this does not work.
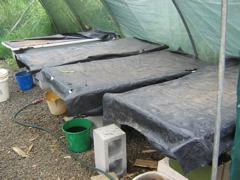
When pile is done, should not be taller then 3/4 of a meter, cover with a thick tarp.
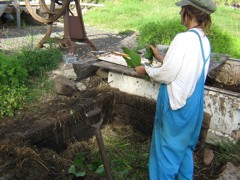
Turning Pile
Yes! your compost pile needs to be turn 3 - 4 times a week at least. There is a method to turning which I wish to share to you. Grab the pitch fork and start turning over the out sides of the first compost into the middle of the second compost bin. Then turn the middle of the first compost to the out side of the second compost bin. This give the cool outer compost to enjoy the hot middle of the compost, Evenly heating the whole compost.
Sweat!
When compost starts to resemble soil, place on top of garden beds, or place in a separate bin to let it further break down.
Composting Problems
Symptom
Compost has unpleasant odor.
Problem
Not enough air due to over watering.
Not enough air due to compaction.
If odor of ammonia, too much nitrogen.
Solutions
Add dry materials such as cornstalks, leaves, or wood chips to soak up excess water.
Turn the pile to aerate.
Cover pile if rains continue.
Turn the pile to aerate.
Add carbon materials and turn the pile to aerate.
Symptom
Pile not heating up.
Problem
Pile is too small.
Insufficient moisture.
Not enough air.
Lack of nitrogen.
Compost may be finished.
Solution
Make pile bigger.
Add water
while turning.
Add water by sticking a garden hose into the center in several locations.
Poke holes into the pile and add water using a watering can.
Turn the pile to aerate.
Mix in nitrogen materials.
Add organic fertilizer.
Use it and start over!!!!
Symptom
Compost is damp and warm only in the center.
Problem
Pile is too small.
Solution
Add more material.
symptom
Large, decomposable items are still in the mix.
Problem
Low surface area.
Solution
Remove items.
Chop or shred before adding.
Symptom
Rodents.
Problem
Presence of meat scraps.
Solution
Only add items recommended for your pile and remove offensive material.
Animal-proof bin.
Symptoms
Compost pile has flies, earwigs, slugs and/or other insects. I find white material throughout my pile.
Problem
Good! Pile is composting correctly. Insects are a sign of a productive compost pile. The white cobweb material are actinometer, part of the microbial community.
Solution
If there is an abundance of flies, bury your food scraps as you turn the pile.
~Worm Farming~
Soil: The foundation of life.
worms: The producers of healthy soil
Worm farming is an essential, part of maintaining the health of soil. so lets learn how to do it :)
Materials
worm farm containers: bath tub, simple polystyrene or wooden boxes, do not use metal containers,
All containers need drainage hole at bottom.
A few buckets or containers: a bucket needs to be placed under drainage hole to collect soil replenishing worm juice :). You'll also need a bucket or container to collect food scrapes from kitchen.
Carbon Material: Straw, shredded paper, dry leaves, shredded cardboard.
Nitrogen: compost, soil, organic fertilizer, fresh grass clippings.
Plug: A thick piece of material, so worm juice can flow through and worms do not fall out.
Lid: something that is not air tight, keeps air flow coming through, but keeps rain out and sun.
Worms: common compost worms are Tiger Worms, Red Wrigglers and Indian Blues. To buy worms or worm farms, consult the Yellow Pages under 'Worm Farms'. Or visit nurseries.
Putting worm farm together
Location: Place container is a shady spot! Mrs sun is to hot for worms, they also enjoy *a moist environment*. Keep worms moist at all times. Prop up container so it is stable with enough room underneath it for bucket to collect worm juice.
Plug: Place thick material on top of drainage hole.
Worm Bedding: Mix together your carbon and Nitrogen materials and place in the bottom of container.
Add worms: worms eat about half of their body weight in one day. The population in a well maintained worm farm doubles every two to three months. So start with 1000.
Note: let worms get to know there home for a day or two before feeding them.
FEEDING WORMS
Worm favorites: All veggies, some fruits. They love a little molasses. Grain products are good, and coffee grindings, paper, leaves and even damp cardboard
worm dislikes: Citrus fruits and peels: lemons, oranges, pine apple, no citrus fruits. They do not enjoy onions, garlic, all dairy and meet products too!
Feeding Method: Place a thin layer of food on top of bedding. Add more when it looks like they have finished. You can add more food if you are going away for a while, although it is they can't eat to much decomposing food because it is to acidic. You can add a little bit of ash from the fire place to make it more alkaline.
Collecting worm Castings and Juice
Worm casting: Are essentially worm poop, that your garden loves, so wash your hands after use.
Collecting worm castings: Take some of the dark soil and place in a shallow tray in the sun. Worms will flee to the bottom sooner then later, so you can take pure worm castings from the top.
Another method: you start feeding worms at only one end of the worm farm container. Do this for about a week. (Worms learn pretty fast.) Now take the bedding/castings out of the end of the farm where you were not feeding them and add it to your plants or garden.
Worm Juice: This yummy juice is really, really high in nitrogen, make sure you water it down 1 to 8 before putting it into your garden.
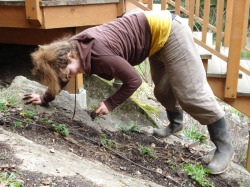
Rock Face Gardening
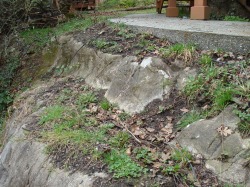
It really is possible to garden any wear, even on a rock face.
This rock face strawberries garden is the extreme of rock climbing. As long as there is soil it will glow. Plus the rocks store heat, which the strawberries love.